Tuesday, May 31, 2011

The Sandwich Series: BLT

Another simple meal, packed with flavor and a little pizazz. We don't often keep bacon in the house but I needed it to try out another recipe later this week so a BLT sounded perfect!  I was also inspired because I saw that episode on Bacon on "The Best Thing I Ever Ate" which I featured in this post
What you see here is some roma tomatoes, butter lettuce and garlic mayonnaise.  I plan to experiment with making my own mayo but until then, I only, I mean only, use Hellmans.  I understand the stuff is terrible for any waistline, but it's just so delicious.  Quite honestly, there isn't much on a BLT, if you use fresh vegetables and sweet bacon, everything should stand on it's own. 
Okay, time for the main ingredient of the sandwich.  Bacon.  I tried using general supermarket brand bacon and I was very disappointed in the lack of flavor.  We also enjoyed thick slab bacon from The Meat House, but I wasn't a fan of the super smokey flavor.  So, Oscar Mayer bacon it is.  We almost always "candy" our bacon to add the sweet/salty flavor. Try it the next time you have bacon on your breakfast or sandwich menu, you won't regret it.
Here's the finished product, pick your favorite bread, layer the [4] ingredients and enjoy.  Do yourself a favor and don't add cheese to this sandwich, it doesn't need it. Enjoy!

Sunday, May 29, 2011

Bowtie Bolognese

A few weeks ago I had an Italian night with some of my lady friends.  I have to say I was a little more than embarrassed with how the food came out.  I made Bruschetta to start, Spaghetti Bolognese, Garlic bread, simple salad and attempted a Turtle Cheesecake - this did not turn out well at all.
I purchased noodles from Terra Cotta Pasta and I was less than thrilled with the fresh pasta.  I really do think it's time to start learning how to make my own.  I don't think I chose the right flavor/kind of noodle, either way I don't think it made a wise choice for the sauce.  
Well, we dined and somewhat enjoyed the meal, certainly enjoyed each other's company and a large bottle of red wine.  I have to say, it wasn't that bad, but certainly not up to par with what I expected of myself.  I made an awful lot of sauce so I had a chance to freeze the leftovers for a rainy day.
Imagine my surprise when we defrosted the sauce to use for an easy meal with Barilla, Bow-tie Pasta, and it was delicious!  We slowly defrosted the sauce in the fridge, dunked the container in a little warm water to loosen it and slowly heated the sauce on the stove until warm and bubbly.  We tossed the pasta and the sauce over a low heat, spooned into bowls and topped with fresh parmesan cheese. Excellent meal! Enjoy [see the link above for the recipe from Mario Batali]!


[more on my attempt with the cheesecake at another time, I think I should attempt regular cheesecake first!]

Saturday, May 28, 2011

Chicken Scallopini & Broccoli Sunshine Salad

Here was a dinner that hit a home-run! I was expecting it to be just a simple dinner, another recipe to try but it was so delicious, we'll be sure to make it again soon.  I have been finding more and more that the recipes that taste the best are the ones with the simplest ingredients.  Plus, this Scallopini calls for lemon juice and it's one of my favorite flavors anyway! You may not know that Scallopini actually describes the type of meat you are using for the recipe, in this case I used chicken, not veal.  I have a hard time eating large amounts of veal and I usually reserve it for when I make bolognese sauce only.


Now, for the second treat of this meal. The Broccoli Sunshine Salad was so delicious!  So quick too, the broccoli is raw [my favorite way to eat broccoli] and the red onion mixed with lemon is just bright and wonderful.  Here's the thing with salads like this, they only get better the longer it's in the fridge allowing the flavors to mesh.  Don't be afraid to use this for a leftover or make it a day ahead of a BBQ or get-together.
This was a perfect spring/summer meal. Lite, quick and full of flavor! Enjoy!

Friday, May 20, 2011

Art Students Design for the Real (JMU) World


A little something from my Alma-Mater, the kind of art and design I grew from at this excellent school. 
Duke Dog for life! :)


[Macaroni] and Cheese

Okay, I used Ziti noodles because I really just don't like elbow macaroni.  I don't know what it is exactly, I just don't like the shape?  Either way, this was a yummy dish but I think next time I'm going to cheese it up and use a mixture of fancy cheeses, I doubt it will be long before I try this so keep an eye out.  
This is a BCC recipe [by now my faithful readers, you should know this stands for Betty Crocker Cookbook] is in the Casserole section of the cookbook, perfect for leftovers!  Always a crowd pleaser Macaroni Ziti and Cheese is easy and a good time to practice your roux skills 
Follow the recipe in the BCC, you'll have plenty for 2lbs of pasta.  We added crisp bacon and caramelized onions to the final product, I highly recommend this.  *Tip: When you see "milk" in a recipe, do your best to use whole milk, you'll get the best results due to the fat content.  If you're a 1% family like us, it'll work just fine, but consider having a small container of whole milk around for extra creamy sauces. * 

Okay, so I planned on baking the Ziti and Cheese in this large dish for the final step...about halfway through cooking the bacon and carmalizing the onions I started to smell something that resembled burning plastic.  I checked my burners, found nothing, then all of a sudden, "HOLY CRAP!" I forgot to take some of my dishes out of the oven before preheating! I've never forgotten to do this!  Those of you that don't live in an apartment, Manhattan, or have a small kitchen might be wondering, why in heavens name do you use your oven for storage. Simple response, I have too many a lot of casserole dishes, pans, etc. and I ran out of places to put them!  Don't judge, you know that your makeup drawer, tool drawer and/or shoe storage has the same problem.  Anyway! So I had to quickly turn off the oven, enlist the help of the Sweet Husband and think of another plan.  Needless to say we opened a lot of windows!  So, thankfully I have back-up because of my large amount of kitchen toys so I used these:
...and our small toaster oven to bake for another 25 minutes.  Go ahead and add a little extra shredded cheese to the top, it'll give it a nice golden brown look when finished.  I'm thinking my next stop today is to get some oven cleaner or all of my casseroles run the risk of tasting like my plastic placemat, which wasn't supposed to be in the oven anyway! *Tip: If you must use your oven for storage, only place your oven safe materials inside just in case, usually I do this but I guess one or two items snuck in...I wonder who could've done that...*
Wait until you have baked the pasta to add the extra ingredients.  If you have fussy eaters but you are dying for some spice in your food life, this is a great way to individualize your dinners without making different meals.  You can dress up or dress down the Ziti and Cheese anyway you like - hot sauce, bacon, onion, extra cheese, meat, peppers, etc. Go nuts! 
I added the bacon first [about 2.5 strips total split between two portions].  The bacon adds the extra saltiness enjoyed by many, I once heard a chef on the show below say "even vegetarians want bacon."

PS. This is by far my favorite show. I'm addicted and currently collecting all necessary data so I can visit each place when I am in their vicinity.  I love that most of the restaurants featured are in NJ & NY, how fitting.
So anyway, time to add the caramelized onions:
Yum! The onions added a sweetness to the cheesy-pasta that tied in the salty bacon and savory cheese.  I guarantee your family will love it, with or without the fancy additions. Enjoy!


Thursday, May 19, 2011

Oprah & Ellen


Love this!

Grilled Halibut Sandwiches

Okay! We took a break from our BCC and moved to one of the many cookbooks we own.  This week we messed with Rachel Ray's 30 Minute Meals 2 and found a recipe for Grilled Halibut Sandwiches, yum! Actually, we used Haddock instead of Halibut, it was fresh and locally caught, better choice I'd say.  I actually followed the directions on this one, almost.  As far as the fish was concerned I stuck to the Old Bay seasoning, which is the reason I picked out this recipe in the first place.  We LOVE Old Bay in this house...I may not be from MD but I have some serious roots in the state and grew up eating blue crab, Old Bay a probably little ink from whatever newspaper we had lining the backyard table.  I introduced the Sweet Husband to MD's magic crabs and seasoning this past summer...
Captain Billy's, MD
He was up to his elbows in lemon, Old Bay and this platter of underwater treats [you can see a little part of the MD blue crab in the far right of the photo].
When I have fish on our meal calendar, I don't purchase until the day we are going to eat it.  Here's another tip, if your fish or the place you're buying from, smells like fish...it's not fresh.  Fish doesn't smell pungent and fishy unless it's getting old.  Fish should smell like clean water, the smell won't go away if you rinse or cook your fish.  This is crucial people, fish is finicky but if you buy fresh, local and day-of you're in for a treat.  
You know your fish is cooked because it will easily break apart or flake into pieces.  The great thing about fish is only takes about 4-7 minutes per side [only slightly longer for thicker parts of the fish, but 7 is usually reserved for a thicker cut of fish like salmon]. 
The bread we used was Panera's Asiago Cheese Focaccia because we had the Broiled Veggie Sandwiches earlier in the week.  It was a great bread to use for this sandwich because it held everything together and didn't take away from the flavors.  
Time to assemble the sandwiches:
There is a method to this...I like to protect the bread from soaking up the tartar sauce so I placed butter lettuce on one side and sliced roma tomatoes on top of the fish.

Then, place as much or as little tartar sauce as you would like.  The recipe RR gave is really delicious, not too salty, not too sweet.  We left out the chopped onion because I simply didn't feel like chopping it up - that and we usually reserve our raw onions for burgers and hot dogs.  

It was so delicious!  The right amount of each layer made for an manageable, albeit messy, sandwich.  The Old Bay stands out and the tartar sauce is the perfect compliment.  Try it, even if you think you don't like fish, give fish a chance.  Enjoy!

Wednesday, May 18, 2011

Baby Shower Cupcakes+

It's possible we're going to do a lot of posts on cupcakes.  Cupcakes are one of my favorite things to bake and share.  They just make people smile...mini pieces of cake with a mound of frosting, you're smiling already! 
How happy are these? A friend of mine is having a little girl soon and I attended her Baby Shower armed with these.  Simple, tasty and perfect for a new little lass.  The cake is a simple butter cake, similar to a pound cake just not quite as dense.  The frosting is my own recipe so until the cookbook comes out, you're out of luck my friends.  I will tell you, it's delicious. 
I used Wilton brand piping bag - not disposable - I do intend to get a larger set of bags, the size I bought just doesn't hold enough frosting for large jobs like this one.  I spend a lot of my time re-filling my piping bag.  For the tip I use Ateco brand tip, #22 that I bought here.  The design is easy once you have the correct tip, a simple circle swirl with and little extra "pouf" at the end to create the peak.  
For the color, I only use Spectrum brand, gel food colors [the color above is "Soft Pink"].  They are the best, also bought here! They won't water down your icing or give it a fake, yucky taste and a little bit goes a long way.  Start small with this brand, you can always add more.  For this pink, I added just a drop and it was enough to make the prettiest pink.  
Here are some more of my cupcake creations if you've missed a post:
Christmas 2010 - Butter cake & Ali's frosting
Christmas 2010 - Chocolate Peppermint Cupcakes
February 2011 - Butter cake & Ali's frosting
From post: Sweet Sixteen
March 2011 - Elmo cupcakes
From post: Cupcakes
March 2011 - Chocolate Whiskey Cupcakes
From post: Cupcakes


Tuesday, May 17, 2011

Quick Enchiladas

Mexican is our default meal.  Usually for nights like tonight when I have rehearsal and the Sweet Husband and I don't eat together.  Casseroles are perfect for nights like this because it's easy to re-heat and slap on a plate.  We always have some sort of tex-mex ingredients in our cabinets for just an occasion.  Last tuesday I rummaged around for some vegetarian refried beans, sweet corn, onions, red pepper or two, enchilada sauce, tortillas and cheese.  That's it. [If you don't have enchilada sauce, you can use taco]
It's simple.  Figure out which way your tortillas fit in the dish.  Put a little of either sauce in the bottom of the dish.  Fill each tortilla like you would a taco - beans, corn, peppers, onions - meat if you want - and a little sauce.  Wrap the tortilla and place seam side down in the dish.  Top with pepper-jack, mozzarella, cheddar, whichever you like and pour the remaining sauce over the tortillas.  Just enough to cover the tortillas and seep to the bottom and sides of your dish.  Bake at 350deg. for about 20-30 minutes - until cheese is melted and sauce bubbly.  Let stand for 5-10 minutes, sprinkle with some scallions, jalapenos, or more cheese, serve and Enjoy!

Monday, May 16, 2011

Sour Cream Coffee Cake

Once again working through the baking section of my cookbooks.  Here was an interesting recipe - and I had all the ingredients in my kitchen.  Of course the photo online was certainly not what I made...but I'll get it next time.  This was actually my first time using a fluted tube cake pan/bundt pan ["oh, it's a caake!"].  
I did something a little different to give it that crunchy coffee-cake feel.  I only layered twice and made the nut, brown sugar, cinnamon mixture the topping of the cake.  It loses it's "tube cake pan" look this way but it made for a yummy crust.  I know it looks brown and crunchy towards the bottom, aka: charred...that's because it is.  I usually don't cook things to their projected bake time because our oven is ridiculously off-sync.  I set the timer for 45 minutes, checked it with 10 minutes to go and it was still gooey...I guess it probably only needed 5 more minutes.  Either way, it's just a little brown on the outside, nothing a good cup of coffee and/or milk can't cure.  
For the Brown Sugar Filling, I used chopped almonds [not pecans] and ground them instead of just finely chopping.  My sister loves crumb cakes, coffee cakes, etc. and she doesn't like nuts messing with her breakfast treats.  So, I, wanting to stick with the recipe as much as possible, just hid the nuts :) 
The center was extremely moist and the glaze isn't too sweet, all in all, yummy! Enjoy!

Sunday, May 15, 2011

Arugula & Broccoli Pizza, "Green Pizza"

Yum right?  We're sticking fairly vegetarian after the success we had during Lent.  We both love how much better we feel and it's so expensive to fill our grocery bill with meat...not to mention the positive environmental impact of leaving it out.  I was listening to NHPR when they mentioned that a family of 5 could make a difference by only skipping meat ONE TIME A WEEK.  Try it, many meat meals are easily replaced with veggies.  Anyway! The Sweet Husband [SH] really loves to make this meal, he found it online when I put him in charge of dinner for an entire week.  Here's the screen shot of the recipe:


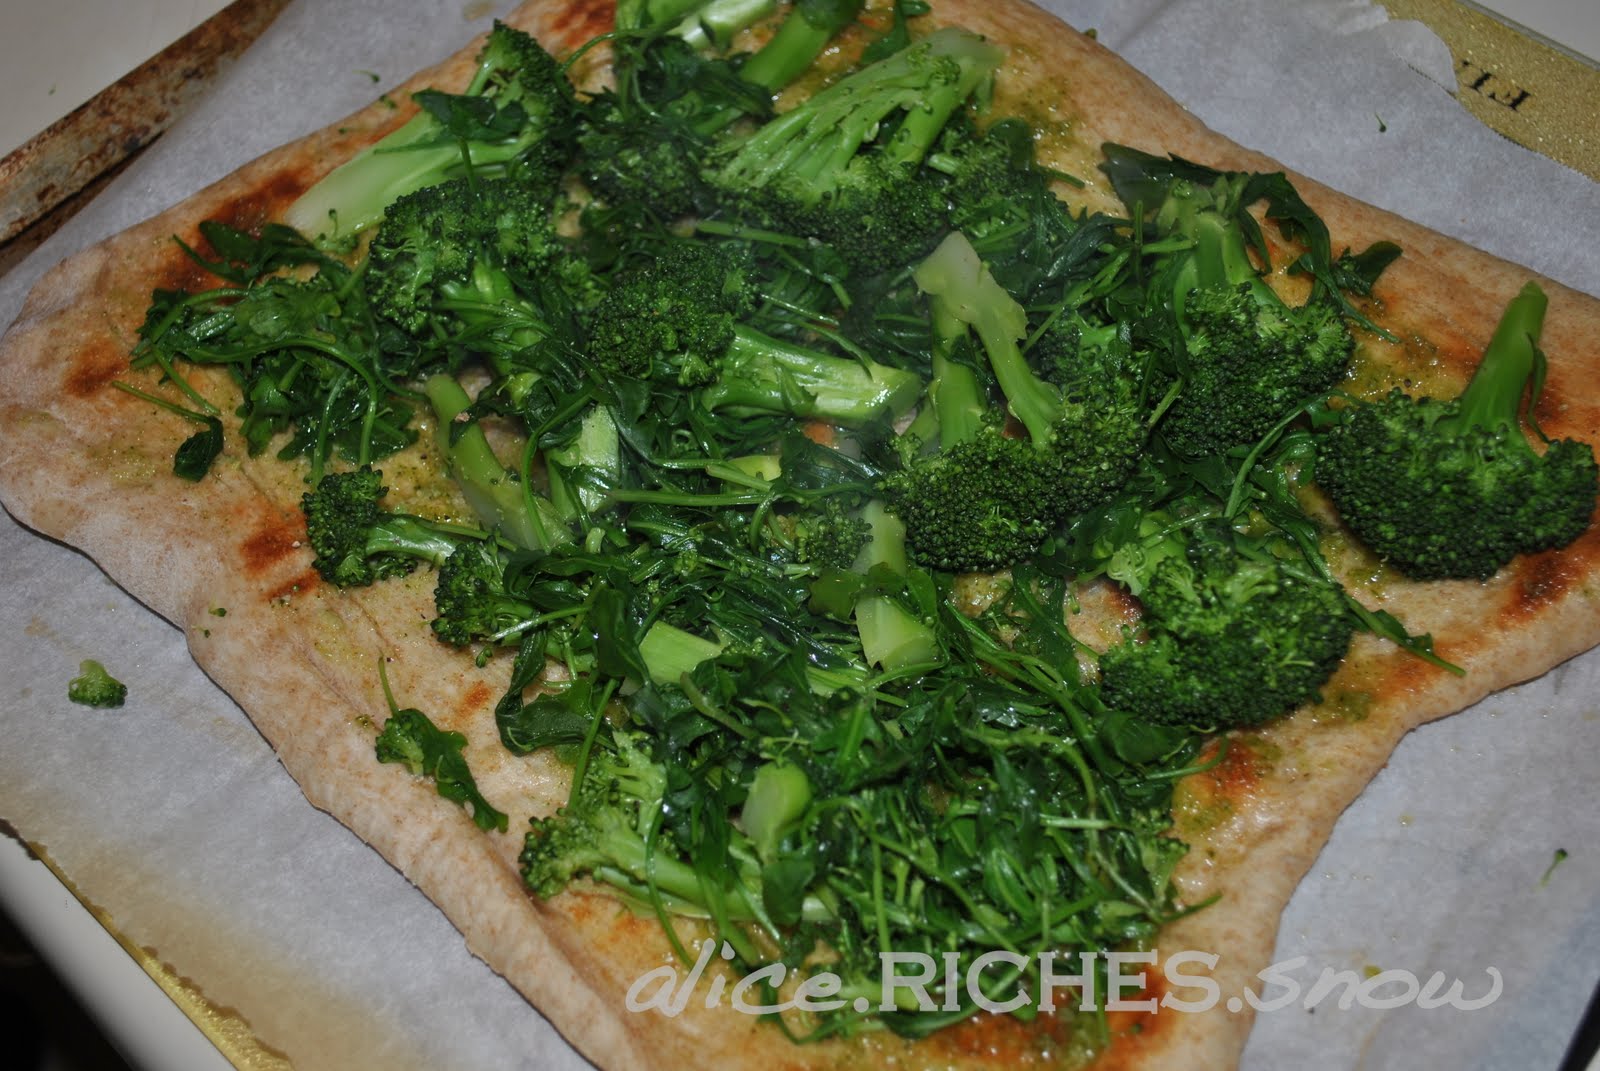
I have no idea where he got it or what the name is, we just call it Green Pizza.  I use the pesto that I make for the Mozzarrella-Pesto Strata recipe or really any recipe that calls for pesto. It's also here online
Use whole-wheat dough and always bake your dough before adding the toppings. Light golden brown will do the trick.  Follow the rest of the recipe for the best results with the vegetables. 
Spread the vegetables evenly across the dough, sprinkle with mozzarella and parmesan cheeses and bake according to directions. 
We had some leftover dough so the SH had a great idea to make Garlic Knots.  Here's a recipe that I found just so I was sure of the cook time.  I literally rolled out the extra pieces of dough and tied them into a knot.  Be gentle with the dough, it will rip if you pull too tight on the knot.  Bake and then shake in a paper bag with olive oil, garlic and cheese.  
It was a starchy evening, but it was filled equally with veggies so I'm not feeling too guilty about it.  Enjoy!

Saturday, May 14, 2011

It's finally here! Part II of "What's Black, White & Red All Over?"

It's finished! Well actually it's been finished for a while but I finally got a chance to get some photos of the space.  Since I re-organized, re-painted, and re, well-everything...I'm in here just as much as the kitchen.  I'm finally able to use it for scrap booking, paperwork, rehearsing, etc. I'm thrilled to have the room completed.  As you might remember, the room was RED! and just didn't fit.  So we chose, yellow! 
BEFORE!
AFTER
I scaled down the items on the shelving and finally got our degrees up on the wall.  
I managed to finally add a little drawing of my own to each wall to play on the branches motif in the remainder of the apartment; plus some Lovebirds sitting happily on the branch, even a little Millie :)


Behind the curtain is an incredibly small closet space that I placed a chest of drawers and several tuperwares to house office supplies, scrap booking and sewing materials.
The space is no longer a dumping ground for papers and any other items that never seem to have a home in our apartment.  Those items I either donated, recycled or threw out!  Enough with the clutter.  The space is open, the color makes a huge difference in how it feels and we don't dread using the space to pay bills...it helps that the color of the walls are no longer red, I don't think it was good for our marriage. 
It's not a picture perfect space, but this is what the room looks like on a regular basis.  I'm all for setting a room for pictures but I think it's important to show that I live in my home, not tip-toe around it.  I'll get fancy with the pictures of food, fair enough?

Friday, May 13, 2011

Mixed Berry Crumble Tart

So, since I noticed that parts of my cookbooks have been mostly untouched, I decided it was time to start working through them.  Here I go through the Pie/Pastry section of my Betty Crocker cookbook.  This is the perfect time of year for tarts and pies alike considering the in-seasonm, yummy fruits.  I couldn't find the recipe online, but it's in the Betty Crocker Cookbook Bridal Edition.  You need a recipe for a Two-Crust Pie [unbaked] and for the Mixed Berry Crumble Tart [see below].
Isn't that just lovely? I love this time of year! Now here's the skinny on the crust, it's important to follow the directions on this recipe [mixing, fridge time, rolling out].  
Now my countertops aren't that large but I managed to have enough room to roll out the dough - hold the tart pan upside down and make sure the dough is about 2-3 inches from the edge.  Rolling the dough around your rolling pin is the easiest way to get it in the pan without it ripping.
 The tart pan: I got it from BBB and it has a pop-out bottom, perfect removing a delicate tart when finished baking.  
Carefully press into the pan and trim edges right to the edge of the tart pan. Set aside.
Combine, 1 & 1/2 cups of strawberries, blueberries, 1 cup of raspberries, 2/3 cup sugar, 2 Tbsp of cornstarch in a bowl, stir to combine and pour into unbaked crust.
Next, make the crumble: 3/4 cup all purpose flour, 1/2 cup sugar, 1 teaspoon  I love orange so I just eyeballed it, probably about 2 Tbsp worth of zest, 1/3 cup of butter.  Use a pastry blender or fork to mix, don't overdue it, and sprinkle over the berry mixture.
Bake 35-45 minutes @ 425deg.  Let cool in tart pan for about 7-10 minutes. Remove from tart pan onto serving plate.  Serve warm with vanilla bean ice-cream or freshly whipped cream. 
This was so incredibly good!  I made it for our Easter Dinner dessert a few weeks back and was thrilled with how well everything turned out.  I didn't rush the steps and paid careful attention to the ingredients in the crust. I hope you have the time and patience to try this recipe, it is scrumptious! Enjoy!

Wednesday, May 11, 2011

Two Side Dishes = One Dinner

Mmm, who doesn't love a baked potato? "I've never met a potato I didn't like," so my Dad says...rightly so as a matter of fact.  We don't eat too many potatoes in our house, the starch content is a bit much on a regular basis.  So we decided to make a meal out of it with a little pasta salad on the side.
First, preheat oven to 400deg. Then, poke a few holes in a clean, scrubbed potato with a fork.  Place directly on your oven's middle rack and bake for 45-60 minutes.  
Meanwhile, cook pasta according to package directions, drain and let cool.  Here is the recipe for the Gazpacho Pasta Salad with Tomato-Lime Dressing [we left out olives because once again, we're not fans].  While your potatoes are baking make the pasta salad.  It was good, but I think it needs a little red-wine vinegar to give it the side dish kick.  Next time, I'll be sure to add some.  
When your potatoes are finished, let stand for about 10 minutes or until they are ready to handle.  Slice lengthwise and gently scrap the pulp from the skins - don't discard! Place pulp in a bowl with any assortment of cheese, butter, milk, sour cream, cream cheese, chives/scallions, s/p, etc. Whatever you like in your mashed potatoes, use here.  Spoon mixture back into potato skins and sprinkle with some sharp cheddar and scallions.  
It's really important to take the the time to bake your potatoes.  Don't rush them! 45 minutes is the minimum here, which gives you plenty of time to prepare another side dish or have a glass of wine and relax. Enjoy!

Tuesday, May 3, 2011

A last minute dessert!


I really don't know anyone who doesn't get excited at the thought of chocolate covered strawberries.  You see them at weddings and catered events but I've rarely seen them prepared for a simple gathering of friends.  Don't forget about this quick and easy recipe [especially this time of year] when you need a little sweet to treat your friends.  I happily entertained a friend of my a few weeks back for a few drinks and I was so upset that I didn't have a prepared cake, cupcake or tart to serve.  I have this weird thing about needing to always feed someone if they walk through my door.  It didn't take long to take stock of my available ingredients and put these together for us to enjoy.   
We usually have all the ingredients lurking in our cabinets and fridge on a regular basis.  I love sliced strawberries with my yogurt, pancakes, granola, cereal and by themselves.  We also do a fair amount of baking so semi-sweet morsels are also usually on hand.  The Sweet Husband is a little more than obsessed with ice-cream sundaes so heath bar crumbles are also on hand - this is optional, feel free to use sprinkles, nuts or nothing at all to garnish your strawberries!
Start with a microwave safe bowl and a cup or two of semi-sweet chocolate morsels.  Microwave [MW] on 50% for 30 seconds, remove and stir.  Place chocolate back into MW and heat on HIGH for 10-12 seconds, remove and mix chocolate with a spoon until well melted. Repeat as needed.  Don't overheat the chocolate, it's important to only subject the chocolate to short bursts of heat.  If you have a double-boiler, feel free to use that method as well.  Personally, I find the MW is so fast and easy for this amount of chocolate. 
Dip the strawberries in the chocolate, dip or sprinkle with your topping of choice and place on parchment paper.  Parchment paper is the best because the chocolate will stick to your strawberries and not the paper.  Finish all your strawberries and place uncovered in the fridge to cool.  Use your intuition but they should be ready to eat in about 20 minutes.  

Monday, May 2, 2011

Mozzarella and Pesto Strata, a must!

I've made this twice and the first time we liked it well enough, but I saw some of the mistakes I made and I perfected the recipe for round two.  Let me tell you, the second time was the charm here, it was divine!  Eggs can be funny to bake with if they are the main ingredient but the real trick is how long you let the eggs and bread sit in the fridge.  The recipe suggests a minimum of 2 hours but no longer than 24, I had no choice but to let the eggs sit overnight because I wasn't going to get up any earlier on Sunday morning for prep time! I already got out of bed at 5:30am to prepare the other casserole to bake and allow the strata to reach room temp. before I plunged it into a hot oven.  I made casseroles for Easter Sunday brunch for our trusty choir members, clergy and other participants, hence the early morning rise.  So, I prepared the strata the night before and let everything solidify for 8 hours.  I was a little concerned with how much egg soaked into the bread, thinking the tops of the bread wouldn't be covered by the rising egg during the baking.  It turned out great, here are the steps:
Pick out a deep casserole dish and cut your bread to match the height of the dish - slightly under.  Make sure you use french bread for this recipe, it'll be slender in diameter and long enough so you won't need more than one loaf.  I placed the bread in the dish before I piled on the pesto so I could reposition as needed without getting pesto all over the place.  
I can't stress this enough, make your own pesto for this recipe.  Pine nuts are expensive so you can use toasted walnuts if you prefer - I use walnuts when I make spinach pesto and the flavor is just as good.  Another trick here is to let the basil sit overnight in a airtight container, in the fridge before using, the color will darken and the flavors have a chance to really blend - just like leftovers.
Spread the pesto evenly on each slice but don't overdue it.  You don't want the pesto to pool on the top of this dish an overtake the red peppers. 
This recipe also called for olives but I'm personally not a fan and really, I don't think the pungent flavor does the pesto and red peppers justice.  Seems like they would hog the spotlight.  So, grab yourself a jar of roasted red peppers and dice up and sprinkle over the pesto and bread.
Go ahead, use the entire amount of mozzarella cheese! You won't regret it.
This is what your strata should look like before you cover it and pop in the fridge for a good 8 hours.  Be sure to carefully pour the egg mixture over the bread, take your time, you don't want to force the peppers around the dish. Don't be alarmed if half of the liquid seems to be "missing" in the morning.  It'll cook up, fluff up and smell incredible after a good 60 minutes in the oven.  Mine didn't look anything like the photo in our book or the online recipe...I find this a good thing.  It looks a little pathetic on the website but it's entirely possible they cut up their bread differently, etc.  I like the way ours looked [fyi: the casserole will sink slightly when you let it sit for about 5 minutes after it comes out of the oven, no worries, it'll still taste delicious].
I really like that this recipe can be used when you have company for the weekend and can spend more time together and less time toiling away in the kitchen when you should be enjoying coffee and conversation with your guests!  Simply take it out in the morning while the oven is preheating and you'll have a delicious meal without the fuss :)